
How to Organize a Pantry That’s Both Beautiful and Easy to Maintain
- Tara M Stewart

- Dec 12, 2025
- 7 min read
Updated: Jan 31
DISCLOSURE: THIS POST CONTAINS AFFILIATE LINKS, MEANING I MAY GET A SMALL COMMISSION IF YOU DECIDE TO MAKE A PURCHASE USING LINKS PROVIDED. HOWEVER, THERE IS NO COST TO YOU. AS AN AMAZON ASSOCIATE, I EARN FROM QUALIFYING PURCHASES. VIEW THE FULL DISCLOSURE HERE
If you’re feeling stuck between wanting a beautiful pantry and one that actually works for your everyday life, this process will show you how to have both.
After a recent move and trying to make a random mix of organizing products work in her new home, Liz was ready for a full pantry refresh, fresh paint, a pretty rug, the whole nine yards. She had a clear vision for the look and feel of the space but wanted to make sure it was organized in a way that truly worked. That’s what made this collaboration such a perfect fit. She set the vision. I selected the containers, created the zones, and designed an organized pantry that functions exactly the way she wanted. Together, we created a pantry that feels warm, cohesive, and easy to maintain.
With over two decades of experience in the interior design industry, Liz Alexander, owner of PDR Interiors, specializes in designing sorority houses across the United States. Her work balances durability with elevated design, creating spaces that feel intentional, polished, and lived in. So you can imagine how excited I was when she reached out for help with her own pantry. Since we no longer live in the same city, this entire project came together virtually, from planning through execution. Since I didn't set foot in her house, huge shout out to Liz for taking such great photos and documenting the whole process for us!
Today’s blog is all about the process we followed, the product choices that supported her design vision, and the systems that made the space work, along with links if you’d like to recreate a similar look in your own home.
Prefer to watch or listen while you organize?
If you want the behind-the-scenes scoop on the "tiny tweaks" that make the biggest impact, Liz and I sat down to discuss this exact project on her podcast, Sorority Chat.
WATCH the episode on YouTube
Now, let’s get into the step-by-step process we used to transform the space.

Step One, Clear Out What’s Not Working

Before adding anything new, we needed to remove what was already in the space. Even good containers can create visual noise if they don’t work together or suit the space.
I suggested removing:
Walmart multipurpose bins
Gray and white Target woven plastic baskets
White tiered stands
Existing woven baskets
Black containers with brown lids
White containers on the top shelf
Wire containers
This is something I see often. Clients try to reuse containers from previous homes or other spaces, which makes total sense because organizing products aren’t cheap, and we do want to reuse what we can.
But when too many different styles, sizes, and depths are mixed together, the space can start to feel busy and disjointed. If your pantry feels “off,” one of the first things to check is whether you’re using the right size containers for the job and whether you simply have too many different container styles competing with each other.
Step Two, Keeping What Is Working

Not everything needed to go. A few containers were doing their job well and fit seamlessly into the new plan.
We kept:
OXO containers for decanting dry goods
Six clear, narrow 10-inch containers
These were the perfect size for the shelves and worked beautifully for visibility. I almost always prefer clear containers on higher shelves so you can easily see what you have, and baskets on lower shelves where you can see into them.
In the case of the OXO containers all we did was add new fresh labels!
Step Three, Selecting New Organizing Products
Once I decided what to remove and what to keep, I started rethinking where items lived and which containers we needed to add. The goal was to achieve the look Liz wanted while, more importantly, creating the function she needed.
One thing Liz knew she wanted was baskets. The challenge was shelf depth. Her shelves measured only 12.5 inches deep, which ruled out many larger baskets. This was also why her previous frosted bins and gray-and-white baskets weren’t working, they were closer to 15 inches deep.
I love those containers and they absolutely have a place, just not here.
We also flipped the pantry layout so most food items lived on the left side, while soda, paper towels, and party supplies stayed on the right. Creating defined zones makes the space easier to maintain and visually calmer.
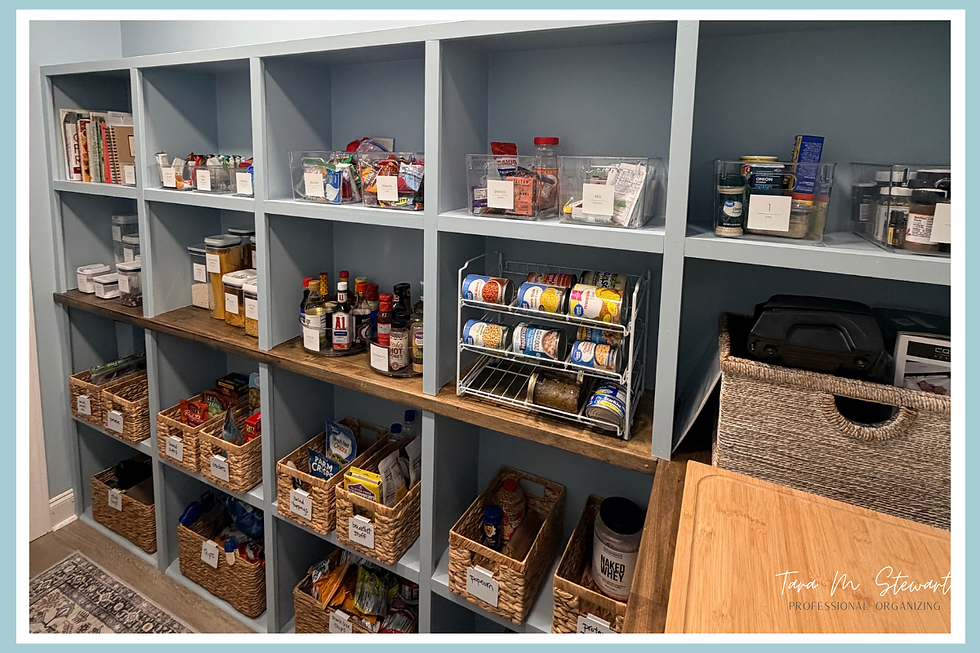
Bottom Shelf Baskets
While I often use water hyacinth baskets from The Container Store*, Liz doesn’t live near one, so I wanted to choose products from retailers with easy returns and nearby locations.
For this project, we went with The Home Edit Natural Woven Medium Bin Basket from Walmart. However, I’ve noticed that some Home Edit products are slowly being discontinued at Walmart. If your local store is out of stock, or if you live near The Container Store, their water hyacinth baskets* are fantastic and same size as the Walmart option.
These baskets were used on the left and right side of the pantry.
Pro Tip: The Container Store frequently runs 30% off or BOGO sales, so it’s worth keeping an eye out.

Upper Shelf Baskets
For the top shelves we went with Storage Standard's Set of 2 Wicker Baskets* from Amazon.
In theory, these should have fit flush. In reality, they sat just slightly over the edge. However, the visual consistency with the lower baskets and the right size for the categories made the small overhang a non-issue.

Packet Storage Organizers
A category Liz and I hadn’t originally discussed but became obvious once everything was visible was snack bars and electrolytes.
For those, we used Youngever 2-Pack Clear Plastic Packet Storage Organizers*. The 11-inch depth makes them incredibly versatile and perfect for protein bars and drink mixes.
Condiment Lazy Susans
BBQ sauce, ranch, syrups, and other condiments that were previously split across multiple bins were consolidated into spinners. These items were moved to iDesign Recycled Plastic Divided Lazy Susan*. The divider is removable, which adds flexibility, and the size works well on 12-inch shelves.

Stackable Can Organizer Rack
Honestly, I’m not a fan of tiered can stands. While they allow visibility, I find them awkward to use and easy to knock over.
Instead, I recommended the Simple Housewares Stackable Can Organizer Rack, which holds up to 36 cans and can be stacked if you have the space. It’s easier to use and far more stable.

Step Four, Implementing the Plan
Some decisions were intentionally left open until everything arrived and was placed on the shelves. Liz has a natural knack for organizing, so I mapped out the plan and she implemented it beautifully.
We discussed that deciding whether certain items stayed in clear bins or moved into baskets would come down to what felt best the day she set it up. I always encourage clients to trust how their brain works.
The goal is never perfection. It’s a system that makes sense and is easy to maintain.
Step Five, Final Touches, Labels

Liz already had labels, but they were small and hard to read, so I recommended going larger for better visibility.
We used Talented Kitchen Minimalist Food Labels in two varieties: The baking set and the fridge and pantry set for the clear containers, then for the baskets we went with these Trohestar Metal Basket Bin Label Clips
Liz chose to handwrite the basket labels, which I love. It allows for easy changes as needs evolve. And yes, handwritten labels are always a valid and often underrated option.
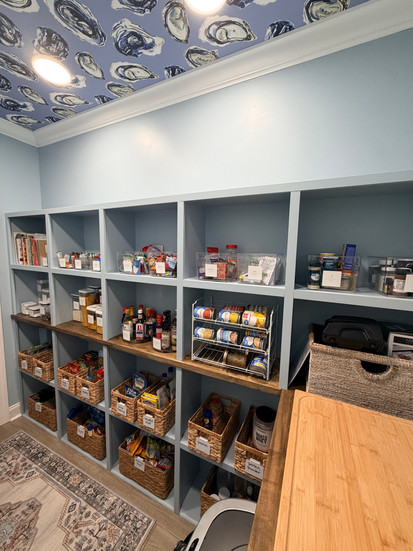
Before and After, More Than Just a Pretty Pantry
Before this project, Liz’s pantry wasn’t “bad.” It was good enough, it was “usable,” but it felt busy, mismatched, and didn’t represent the look she was after. Containers didn’t fit the shelves properly, categories were scattered, and the space never quite felt finished, even though everything technically had a home.
After the refresh, the difference wasn’t just visual. The pantry now works with her habits instead of against them. Categories are intentional, containers fit the space correctly, and everything has room to breathe. The result, a pantry that feels calm, cohesive, and easy to keep up with, while still supporting the warm, elevated look Liz envisioned.
There is a difference between organizing and interior decorating. Both matter, but they serve different purposes. Interior design is about how a space looks and feels, while organizing is about how items are stored, accessed, and how the space is maintained over time.
I always tell my clients, I am NOT an interior designer, don’t ask me what color to paint your walls or what couch to pick out, but I can tell you exactly what size and height basket will work, or what container is best for your baking habits. When function comes first, the design choices land better, last longer, and actually feel good to live with.
That’s why this collaboration worked so well. Liz focused on the vibe and overall design, and I focused on the systems and containers that support how she uses her pantry. Together, those two pieces created a space that looks beautiful and works hard.


Could Virtual Organizing Work for You?
If you’re feeling stuck in a space, overwhelmed by options, or just want a professional set of eyes to help you make confident decisions, virtual organizing might be a great fit. It’s also ideal if you’re outside our service area or simply want guidance you can implement at your own pace.
I’ll happily suggest which baskets will actually fit your shelves, even if I still refuse to weigh in on your paint color.
To get started, fill out the contact form here.
Scroll through the images below to see more of Liz’s signature design details and the special touches that bring this pantry to life. You can find Liz Alexander's' beautiful website here, or follow her on Instagram!


Great post! Choosing reliable Larders Suppliers is important for ensuring quality storage solutions and better kitchen organization. Good suppliers provide durable, well-designed larders that help keep food items neatly arranged and easily accessible. Thanks for sharing this helpful information!